How to configure AWS for development and deployment
Step by step guide on how to create and configure AWS credentials
Set up AWS
The first step is to create an AWS free-tier account if you don’t already have one at https://portal.aws.amazon.com/billing/signup#/start

Once you have a registered account, sign in by clicking on the Sign in to an existing AWS account link and enter your username and password:

After you are logged in, you will be redirected to the AWS Management Console page

For security reasons, I suggest going to the security credentials page at https://console.aws.amazon.com/iam/home?#/security_credentials to set up multi-factor authentication (MFA) for your account:

User passwords can be easily compromised. By enabling MFA, you immediately increase your account security by requiring multiple forms of verification to prove your identity when signing in. You can read more about multifactor authentication.
Next, we need to create an IAM user. An IAM (AWS Identity and Access Management) user gives permissions to people to perform interactive tasks or make programmatic requests to AWS services using the API or CLI. You can read more about AWS Identity and Access Management (IAM) and IAM Identities. Click on Users on the left sidebar of the IAM page or click on Services on the top menu and search for IAM.
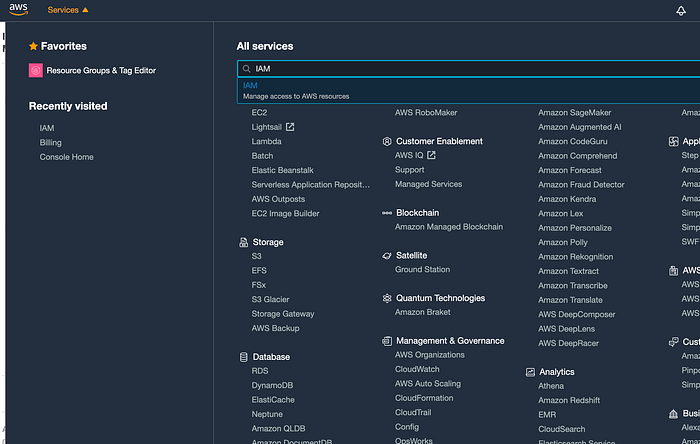
Clicking on IAM will take you to the IAM Page Dashboard.
Next, create a user by clicking on Add User which opens up the form below:
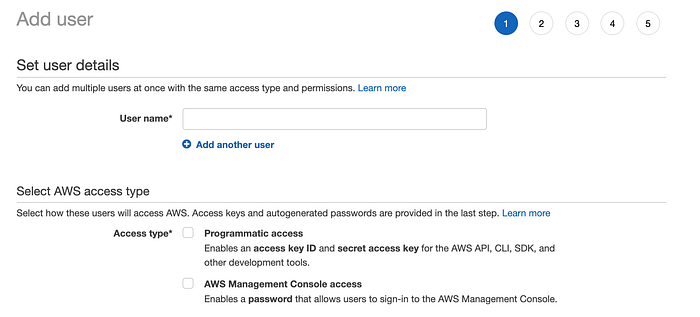
You need to choose a username and select the access type. Select Programmatic access as we require access to the AWS API, CLI and development tools. This creates an access key for each new user. Click next to set permissions for the user
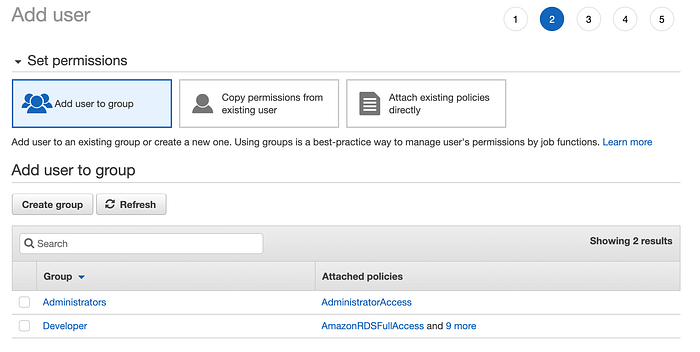
I usually prefer setting up a Permission group and then adding the user to a group. We can use groups to specify permissions for a collection of users, which makes it easier to manage permissions for those users. With groups, we can attach policies to multiple users at once.

In the example above, each user belongs to a single group. However, users can added to multiple groups. Also, every user in a group automatically has all the permissions assigned to the group.
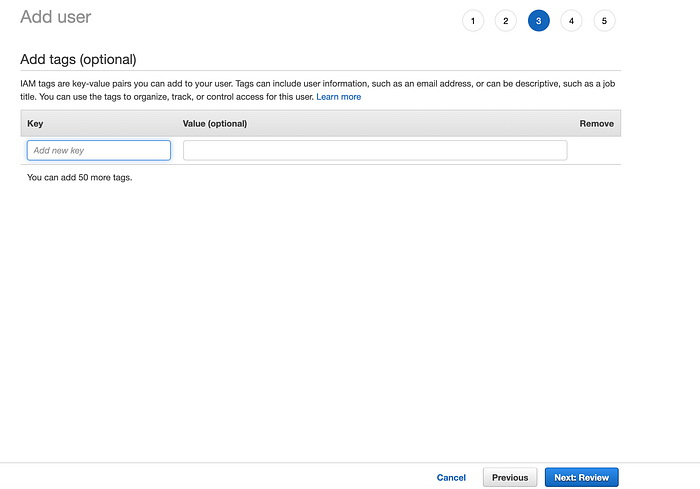
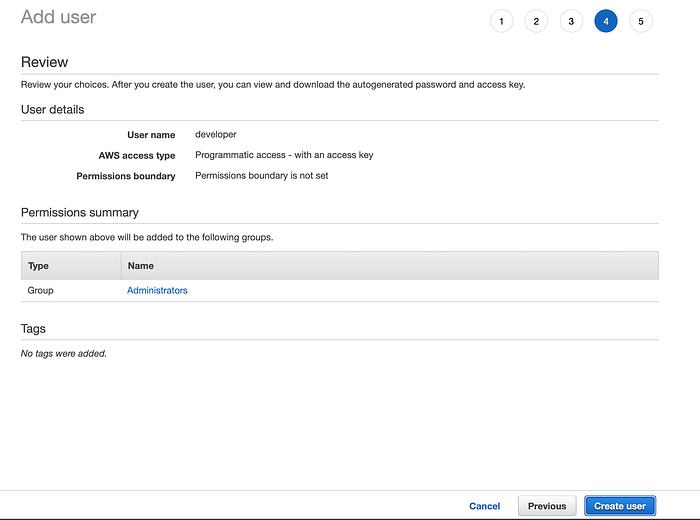
Clicking continue takes you to the optional tags setting. Leave the default settings and click next to go to the review page.
On the review page, you can review your choices and go back previous steps if you need to make changes. Click on Create user to complete the process and create your user.
You can view or download the access keys when you get to the Final page.
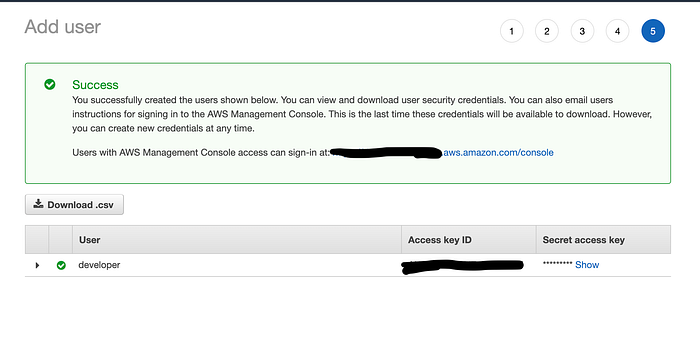
It is important to save the Access key ID and Secret access Key as we will need it. More details on how to create an IAM user.
Next, we also need to install the AWS-SDK on our local machine:
$ npm install -g aws-sdkWe also need to install AWS CLI. On macOS we can install by running as following on the command line:
$ brew install awscliAWS CLI however has a dependency of Python or Pip. Please find more information on how to install Python or Pip or AWS CLI.
Next, we need to configure our settings for the AWS Command Line Interface (AWS CLI) to enable us to interact with AWS. We need the previously saved Access Key ID and Secret Access Key. Run the following on the command line:
$ aws configure
And enter your Access Key ID, Secret Access Key, Region and preferred output format.
When you run the command aws configure, the credentials and config files get updated. The credentials file is located at ~/.aws/credentials and config at ~/.aws/config on Linux or macOS, or at C:\Users\USERNAME\.aws\credentials and C:\Users\USERNAME\.aws\config on Windows. These files can contain the credential details and configuration settings respectively for the default profile and any named profiles. You can manually update the files by adding additional profiles. See Configuration basics and how to set up AWS — Credentials.
What then happens is that behind-the-scenes Serverless uses these credentials and the AWS SDK to create the necessary resources in the AWS account specified in the credentials.
Deployment
There are instances where we may want to specify a different AWS profile per project/stage/environment. This allows each environment in our project to have its own API endpoints, database tables and IAM policies. We can do this by keeping environments in separate AWS accounts using AWS Organizations.
Create a New AWS Profile
This is only necessary if you intend to use a different profile or multiple profiles during deployment.
To create a new AWS profile, follow the steps outlined at the beginning of this article — Set up AWS and take note of the Access key ID and Secret access key. Next, configure the new profile in your AWS CLI as follows:
$ aws configure --profile <NEW-PROFILE>Where <NEW-PROFILE> is the new of your new AWS profile. You don’t need to change the Default region name and Default output format.
At the start of this article, we used the serverless invoke local command to run our undeployed Lambda function locally using the default AWS profile in ~/.aws/credentials under the [default] tag. We can switch profiles in the command as follows:
$ AWS_PROFILE=<NEW-PROFILE> serverless invoke local --function helloBy adding AWS_PROFILE=<NEW-PROFILE> at the beginning of our serverless invoke local command, we are setting the variable that the AWS SDK will use to figure out what your default AWS profile is.
We can also export this profile so we don’t need to specify on the command line every time:
$ export AWS_PROFILE=<NEW-PROFILE>Set Profiles per Stage on Deploy
We can deploy using multiple profiles per stage using the following command:
$ serverless deploy --stage <STAGE> --aws-profile <PROFILE>Where <STAGE> can be dev or prod and <PROFILE> is the name of the AWS profile.
To simplify this process and save us needing to specify these variables in our deploy commands, we can add the profiles to serverless.ts by first modifying our custom object as follows:
custom: {
  region: '${opt:region, self:provider.region}',
  stage: '${opt:stage, self:provider.stage}',
  ......
  profile: {
    prod: 'prodAccount',
    dev: 'devAccount'
  }
},
And then theprofile property of the provider object as follows:
provider: {
  name: 'aws',
  runtime: 'nodejs12.x',
  ...
  profile: '${self:custom.profile.${self:custom.stage}}'
},
This assigns the value of our profile based on the current stage defined in custom.stage.
This means that when we deploy to staging or production, the Serverless Framework will use the assigned profile and provision the resources inside the profile user’s AWS account. Now we can do this:
$ serverless deploy --stage <STAGE>Where <STAGE> is the environment stage. We no longer have to set the --aws-profile option.
Deploy to AWS
To deploy, we can use either the default AWS profile by running the following in your working directory:
$ serverless deployOr if you have multiple profiles and wish to deploy with a specific profile, then you have to run the following command:
$ serverless deploy --stage devAnd it will deploy using the profile set for the dev stage.